How to make your own connected fashion pattern
Published 18 October 2016 by Nicolas Barrial
The 4th Fashion Tech Week in Paris culminated on October 13 at Institut français de la mode, with an exhibition of smart clothing. If you also wish to invent new uses for textiles, follow the guide to build your first e-textile circuit.
The 4th edition of Fashion Tech Week dedicated to connected clothes, 3D printing and innovative textiles, was held on October 6-13 on the sidelines of Fashion Week. For its closing, the two organizers Alice Gras, founder of Hall Couture, and Claire Eliot, who uses 3D printing and electronics for her creations, invited designers to exhibit at Institut français de la mode (IFM) in Paris. Featured there were Elisabeth Jayot’s stitch-free, laser-cut garments, naturally produced complied silk, and hackproof jackets.

When it comes to electronic frills and augmented patterns, there are kits to initiate you to fashion tech, which include circuit boards dedicated to textiles (such as Lilypad, an Arduino that can be sewn, or Adafruit’s Flora and the little Gemma), as well as sensors, LEDs, etc. Below are instructions on how to make your first e-textile circuit—a LED and its power—based on a tutorial (in French) by two fashion/electronics experts, Rosaria Macaione and Romana Carninale.
Materials
Either buy a Lilypad Design Kit for 90€ (but you won’t need the controller), or buy separately for a total cost of 20€:
– Lilypad LED
– conductive thread bobbin
– Lilypad coin cell battery holder — 20mm
– needles
– CR2032 coin cell battery — 20mm
Other equipment:
– Pair of scissors, fabric and embroidery hoop.
Preparation
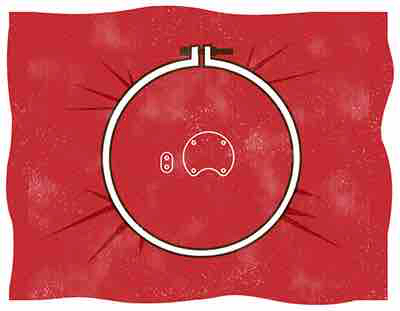
Pull the fabric over the embroidery hoop. Cut 60cm of conductive thread and thread the needle. Pull the two ends through equally and tie in a knot. On the fabric, place the battery holder (without inserting the battery) and the LED. The pins (holes) marked positive and negative on both items should point in the same direction.
Positive trace
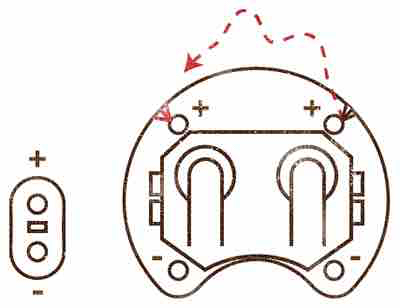
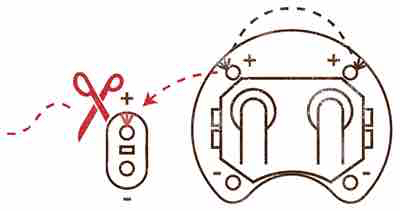
Start by sewing the positive pin of the battery holder, located opposite the LED. Pull the needle through three times, to make three stitches, and tighten. Then, make a series of stitches above the holder to join the second pin. Affix it in turn with three stitches. Now trace a new line of stitches toward the positive pin of the LED. Sew three more stitches to affix it. Tie the thread and cut it.
Negative trace
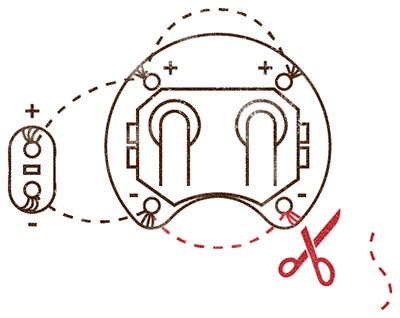
Same operation as above, but starting at the negative pin of the LED.
Finish
Make sure there are no loose threads under the embroidery hoop, in order to avoid contact between positive and negative traces. Finally, insert the coin cell battery. If the LED lights up, you have successfully completed your first e-textile circuit.
Tips by Claire Eliot, interactive clothing designer
Based on her garments exhibited at IFM, in particular a shirt that blinks in sync with sound, Claire Eliot offers us a few secrets for makers. No Lilypad here, as Claire prefers the smaller Arduino Nano. Because she couldn’t find any sewable LEDs to her liking, she used normal LEDs. To affix them, “I took apart a bracelet and soldered each LED onto the links to get thread through.”
“Reactive Shirt”, the shirt that blinks in sync with sound
“I use nail polish and glue as insulators to avoid short-circuits,” she continues. As her creations were to be used for a music video shot inside a flooded tunnel, she insulated “the battery in resin, with tape around it”. Speaking of DIY… Claire likes her garments to be considered wearable. “In fashion tech, there are superb pieces, exoskeletons full of electronics, but you can’t really move with them.”

“Embedding is my favorite part, hiding systems in classic clothes, such as shirts, in which you can be active.” Claire plans to create her own circuit boards, free of unnecessary components, in order to miniaturize and drill holes in the right places. “The electronics should adapt to the clothing, not the opposite,” she concludes.
More on Fashion Tech Week and Claire Eliot’s creations
Rosaria Macaione and Romana Cardinale’s blog
